
Repairing or replacing a damaged section of your roof saves you time and money. However, a complete roof replacement with resilient materials future-proofs your home against harsh weather and potential leaks.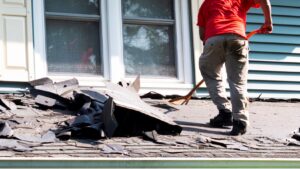
Cracked or missing shingles, a sagging roof structure and moss and algae growth are all signs that your roof needs attention. Regular maintenance and repairs help extend the life of your roof. Contact Las Vegas Roof Repair for professional help.
A roof’s shingles help keep water out, but they can also be damaged by hail, wind or even the sun’s ultraviolet rays. If a shingle is damaged, it’s important to replace it promptly or you could have water leaks.
If you’re planning on doing a roof repair yourself, it’s important to take safety precautions. Be sure to wear sturdy shoes, a helmet and gloves. Use a stable ladder and always work in good weather. Also, consider having a friend assist you, especially if you’re not familiar with roof repair techniques.
Begin by inspecting the damage and determining how many replacement shingles you need. Be sure to select shingles that match the size and color of those already on your roof. You’ll also need a ladder, roof cement, roof nails and a caulking gun.
When replacing a damaged shingle, you should start at the top of the roof and work down. Place your pry bar beneath the shingle immediately above it. Lift slowly to avoid breaking the sealer strip connecting it to the rest of the shingle. Pull up the shingle and expose the first row of nails. Remove these nails using a claw hammer.
Next, position your replacement shingle over the hole and secure it with roof cement. If the shingle doesn’t fit snugly, reseal the three edges of the shingle to prevent leaks. If you’re unable to seal the shingle, contact a professional to fix your roof.
If you see a shingle that’s curled up, it’s probably a sign of age and needs to be replaced. Curled shingles are less likely to hold up against high winds and may become detached from your roof during a storm.
When you’re repairing curling shingles, it’s best to use roof sealant to help with the adhesion process. You can find this at most home improvement stores and it comes in a variety of colors to match your existing shingles. After sealing the shingle, be sure to apply a layer of granules on top to camouflage the repaired area. When selecting a roof sealant, choose one with a low VOC (volatile organic compound) content to minimize your home’s environmental impact.
Flashing
Essentially, roof flashing is a layer of moisture-resistant metal placed in key parts of the roofing system where there are gaps or intersections. These include where the roof plane meets walls and dormers, around chimneys and vent pipes, skylights, and other features on the building. The purpose of flashing is to seal these gaps and prevent water from seeping into the roof shingles or other materials.
It also helps to keep water out of areas like dormer walls, gable ends, and roof valleys. This protects the roofing materials from water damage, which can lead to mold growth, wood rot, and other problems that threaten the structural integrity of the home or building.
Flashing can be made of a variety of materials, although galvanized steel is the most common option due to its durability and resistance to corrosion. The material is usually installed with an adhesive or a sealant to help ensure that it stays in place and keeps water out. Roof flashing can be used in conjunction with a vapor barrier, which is typically a sheet of waterproof plastic, and a roof membrane or shingle covering.
How often flashing needs repair depends on a number of factors, including the severity of weather conditions and the amount of wear and tear that the roof undergoes. Severe storms and temperature changes can cause the flashing to deteriorate, allowing water to seep through and damage the roofing materials below. Regular inspections can help to identify these issues early and take steps to repair them before they become worse.
Because flashing plays a crucial role in protecting the roof and the materials underneath, it is important to have it repaired as soon as you notice any signs of deterioration or damage. A professional roofer can address these issues quickly and efficiently to preserve the longevity of the roofing materials and protect your home from water damage and other related problems. By addressing these issues quickly, you can save money on repairs and avoid costly roof replacement. A & J Reliable is happy to provide roof flashing services in Pasadena, Burbank, Long Beach and Los Angeles. Contact us today to schedule an appointment.
Built-up roofing (BUR)
Built-up roofing, or BUR, is a time-tested and durable roof system. Its resilience and multi-layered protection make it an ideal solution for commercial and industrial structures with low-sloped or flat roofs. However, like any roofing solution, it requires regular inspection and maintenance to ensure long-term performance. Professional roofing services can help you identify and address potential problems before they become a major problem, saving your structure money in the long run.
A built-up roof has multiple layers that work together to create a unified membrane. These plies can be bitumen (typically asphalt or cold tar), fabric, adhesives, or an alternating combination of the three. The first layer is the base sheet, which is installed over polyisocyanurate insulation or a cover board. This layer is typically adhered using mechanical fasteners or hot asphalt.
The next layer is an alternating sequence of ply sheets, or felts. Depending on the type of BUR, this could be fiberglass or tar paper. On top of this, installers will apply hot or cold asphalt. The resulting mixture is then rolled onto the base sheet and other ply layers. Afterward, a surfacing material such as gravel is placed for durability and weather resistance. Finally, a protective coating can be added to reduce energy consumption and improve water runoff management.
Compared to single-ply roof systems, BUR is more resilient to damage from punctures and has an extended lifespan of more than 70 years. Its ability to resist a variety of environmental factors and foot traffic makes it a solid choice for any property, but it requires regular inspection and maintenance to maintain its integrity and extend its longevity.
When a commercial roofing contractor performs maintenance on a BUR system, they inspect the roof for signs of moisture penetration or structural damage. They can then repair cracks, seal leaky seams, and repair weakened areas of the system. In addition, they may add an elastomeric coating to enhance waterproofing and increase longevity.
As a result of the many layers and diverse materials, BUR roofs require more maintenance than other types of roofing. Regular inspections can prevent unexpected issues and prolong the lifespan of the roof by 15-20 years.
Gutters
A gutter (or eavestrough) is a pipe attached to your roof’s fascia at an angle and designed to catch falling rainwater, directing it away from the house. Gutters should be regularly cleaned and inspected for clogs, leaks and other damage to prevent water from overflowing onto the roof, siding and foundation of your home. In addition to causing damage, standing water can encourage the growth of mold and mildew.
Inspecting your gutters can help you spot problems such as disconnection from the downspout, holes, missing or broken sections and loose hangers. You should also look for rust or corrosion, as these can lead to leaks and further damage. If you find any damage, it’s important to repair it promptly to avoid larger repairs.
Begin by removing any debris from the gutters. Use a ladder to reach the gutters, and be sure to wear protective gear, including gloves and safety goggles to protect your hands and eyes from sharp edges and caulking spills. Make sure the ladder is stable and extends about 3 feet above the gutter line to give you room to work comfortably. You’ll also want to have someone help you hold the ladder and assist with tools.
Next, remove any rust or corrosion from the gutters with a wire brush and sandpaper. Once the gutters are clean and dry, apply primer and then two coats of bitumen paint. Leaks are common in gutters, so be sure to check for them after each painting session.
Once you’ve repaired any leaks, it’s time to tackle the bigger jobs. Depending on the type of gutters you have, you may need to replace gutter spikes or ferrules, replace or tighten downspout connector brackets, install new downspout extensions and re-seal the seams.
If you’re not comfortable with climbing a ladder or don’t have enough time to perform the above tasks, consider hiring a professional roofer to take care of your gutters. A professional will ensure the job is done correctly, preventing further damage to your roof and foundation and saving you money in costly repairs.